Sunday, July 12, 2009

eggplant!!


one vegetable I have always found perplexing is eggplant. I tried to cook it once YEARS ago (before I was even vegan!!) and did it totally wrong, and it was inedible, and ever since then I have avoided trying to cook with it. I love the taste of it, and will eat it when I go out, but that's it! anyway, the other night I went to a friend's house for dinner and she made a baked eggplant dish with tomato sauce. we ate it over penne pasta with herbs, and I could not get over how amazing it was! I asked her what the key to cooking eggplant was, and she said that you needed to soak it in salt water for about 20 minutes.
so, today I went to Trader Joe's and bought an eggplant, a jar of marinara sauce, a bag of sliced mushrooms, and some frozen fire roasted peppers and onions.

I sliced the eggplant and let it sit in a bowl of salt water for about half an hour (my slices were really thick). I then preheated the oven to 400 degrees. to assemble the dish, I spread a thin layer of sauce in an 8x8 baking dish, then layered the eggplant (I slightly overlapped the edges to fit them all in the pan), mushrooms, and peppers, then covered everything with the rest of the sauce. I covered the dish with aluminum foil and baked for about 25 minutes.
while the eggplant was in the oven, I boiled a pot of water to make the pasta.

when the pasta was done I drained it and tossed it with a little bit of olive oil and italian seasoning.
basically, this dish is amazing and I can't wait to start experimenting more with eggplant!!

this meal cost less than $5 to make (all ingredients were bought from Trader Joe's), and makes at least 4 servings!

Tuesday, July 7, 2009

Spinach Pasta


Spinach Pasta


like always, I'm going to try to promise to get back on track with my recipes! I've been a little short on dough lately so I haven't been creating the most unique meals, but this is something I just whipped up.
I was watching "Everyday Italian" with Giada De Laurentiis (whom I normally CANNOT STAND) and she made a dish similar to this. I like watching her show, since a lot of italian foods can easily be made vegan. she used goat cheese and cream cheese for her sauce, and I obviously omitted the goat cheese. also, she used a few cloves of fresh garlic. I, being the terrible chef, did not have any on hand but I did have some freshly made garlic hummus. because I was omitting the goat cheese, I felt that this would also add more substance to the sauce.

    what you need:
  • fresh organic baby spinach (I used about 1/2 of a family size bag!)

  • 1/2 c soy cream cheese (I used the non-hydrogenated tofutti kind)

  • 1/4 c garlic hummus

  • 2 c organic whole wheat penne pasta (or whatever shape you have on hand)


cook your pasta according to its directions. in the meantime, divide your spinach into two piles. throw one pile into the food processor along with the hummus and cream cheese. roughly chop the other and set aside until the pasta is done.
once the pasta is done, drain and add it back to your pot. pour the sauce mixture (it should be relatively thick... about the consistency of ranch dressing), and mix in the roughly chopped spinach. enjoy!


I'm starting classes again next week, so my goal this weekend is to make a few meals that I can freeze to have throughout the week. so far on the menu is stuffed shells, pierogies (I made some yesterday and have a ton of filling left!), and an asian tofu stir-fry!

Friday, May 15, 2009

Bean and Cheese Quesadillas


(I served these with a side of roasted potato slices seasoned with garlic and montreal steak seasoning!)

I was watching the show Semi-Homemade with Sandra Lee the other day and I was inspired by a dish she made. she was making party snacks, and for one of them she made her version of a Mexican pizza. she used beef and other ingredients, toasted them lightly in a skillet, and then baked them.
I wasn't sure if these were technically quesadillas because they're mostly filled with beans, but wikipedia confirms that they are quesadillas.

This recipe makes 2 pizzas/quesadillas. If you're serving them with side dishes, these could easily feed 3 people.

    What you need:
  • 4 8-inch flour or corn tortillas

  • 1 can refried beans

  • 2 slices vegan cheddar cheese (I use Tofutti brand*, which IMO is the best!)

  • 1/2 cup salsa

  • mild banana pepper rings


  • garnish:
  • 1 avocado, sliced

  • vegan sour cream

  • salsa

  • hummus (yes, I LOVE hummus with Mexican food!)


preheat oven to 350 degrees.
1. heat the refried beans and salsa in a small sauce pan.
2. in the meantime, slice/tear your cheese slices and melt a little butter in a skillet over low-medium heat.
3. once the beans are heated, spread a generous amount onto a tortilla. top with cheese and banana pepper rings, and then top with a plain tortilla. carefully transfer to the skillet, and cook on each side until golden.
4. repeat process with second quesadilla. place both onto a cookie sheet, and bake for an additional 10 minutes so that everything inside gets nice and melted.

cool for about 10 minutes, then cut into triangles with a pizza cutter. garnish with salsa, avocado, and hummus, and enjoy!

* if you live in Philadelphia, Tofutti brand slices can be found at the Natural Food Market on 20th and Walnut. it took me the LONGEST time to find these. Whole Foods, TJ's, Acme, Superfresh, and Shoprite DO NOT carry them.

Saturday, April 18, 2009

vegan enchiladas


these came out surprisingly amazing, despite the gross picture (but how do you make an enchilada look good anyway?!). this was the second time I'd tried making enchiladas- the first time I followed a recipe online, and this time I used what I had learned as a starting point but doctored these up to my liking.

tip: I'm a fan of making quick and healthy vegan meals. the first time I made vegan enchiladas, I made my own enchilada sauce as per the recipe I was using. however, this time around I found that buying a bottle of enchilada sauce not only was a lot easier, but probably cheaper.

    what you need:
  • 1 pound extra-firm or firm tofu

  • 1 jar salsa

  • 1 jar enchilada sauce

  • 1 cup water

  • 3 tbsp water mixed with 1 tbsp cornstarch

  • tortillas (corn or flour)

  • 1/4 cup nutritional yeast

  • 1/2 cup vegan sour cream + a little extra

  • 2 tsp cumin

  • 2 tsp garlic powder


* preheat oven to 350 degrees

1. thoroughly drain the tofu and crumble very fine in a mixing bowl.
2. add the salsa, 1 tsp garlic powder, 1 tsp cumin, vegan sour cream, nutritional yeast, and a bit of salt and pepper. combine well.
3. in a separate bowl, add the enchilada sauce and water. after thoroughly mixing the cornstarch and water, add that to the enchilada sauce (this is to stretch the enchilada sauce). add 1 tsp cumin and 1 tsp garlic powder. mix well.
4. in a non-stick baking dish, spread a thin layer of enchilada sauce.
5. place a tortilla on a plate. scoop tofu mixture down the middle of the tortilla, top with a dollop of sour cream, and roll up like a crepe. set in pan, and continue doing this until your pan is full of enchilada rolls.
6. thorougly cover the enchiladas with the rest of the sauce (you want to make sure you coat all of the enchiladas to prevent drying out/burning).
7. cover dish with aluminum foil and bake for 30-45 minutes.

Thursday, April 9, 2009

super easy fried tofu


I have to admit, I am not the best at cooking tofu. there really are only a handful of tofu dishes that I think I'm good at making (meaning, I can stomach them). I love tofu, it's just that I can never seem to get it right!
I just went to the "multicultural" shop on the corner. that place is insane. they sell everything from tofu to chinese fruits and vegetables to tortillas and other spanish staples, to curries and every type of rice noodle you can think of! anyway, I grabbed ingredients for my next few meals (enchiladas, coconut curry, and fried tofu).

here's the first of my tofu dishes!!

    what you need:
  • cornstarch

  • garlic power

  • salt

  • pepper

  • frying oil of your choice (I use canola, but vegetable or grape seed would be good too)

  • frying pan or deep fryer


all of the measurements are approximate. you really can't mess this up! I probably used about 1/2 cup of cornstarch, 1 tsp garlic powder and a few shakes of salt and pepper.

1. mix cornstarch and spices in a bowl.
2. heat oil in a pan or in a deep fryer. I used a pan, and filled it about 1/2 an inch full.
3. while oil is heating up, press/drain the tofu and cut into desired shapes.
4. coat tofu pieces in cornstarch mixture, being sure to get all sides. when oil is hot enough, carefully place tofu into oil and fry until golden brown (flipping occasionally).

you need to have some kind of dipping/coating sauce. I was going to make sweet and sour, but the corner shop didn't have rice vinegar so I just used some of my trader joe's soyaki sauce and it was divine :)

Sunday, March 15, 2009

Restaurant Review

Cafe Ole

147 N 3rd St
Philadelphia, PA 19106
(215) 627-2140


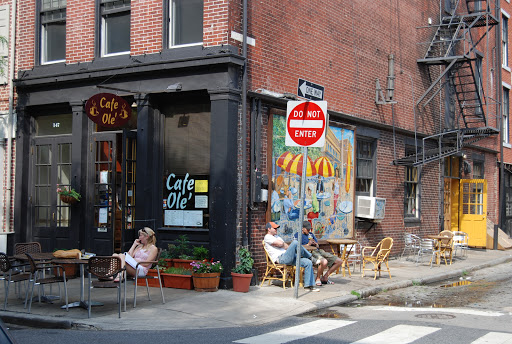
I've never spent much time in the Old City neighborhood of Philadelphia, but since I began an internship at a boutique there I've been discovering a ton of awesome new places to eat and shop. Last week my boss asked me to pick up lunch for us at Cafe Ole, about a block and half from the shop. I'd never been there before and didn't really know what to expect. It was around noon, and the place (which is very small) was packed with people grabbing lunch. I skimmed the menu and noticed that there was a lot of mediterranean food (things like hummus plates, greek salads and wraps, etc) but also items with a european twist like grilled cheese on panini. I ordered the house special lentil soup for my boss, which comes with a side of pita bread, and the "vegan wrap" for myself. My boss raved about the soup, and I LOVED the wrap. It started with a spinach tortilla, which was then coated with homemade hummus and filled with roasted veggies- red peppers, portabella mushrooms, and onions- and then topped with fresh baby spinach and garbanzo beans. It was very good, and our total came to just under $10.
Despite the fact that it was busy, the service was quick and attentive, and the person who helped me (who I learned was the owner) was very sweet. I felt that if I were to visit at a slower time, it seemed like it could be a very relaxing setting.
Along with their extensive lunch items, they also have all sorts of tea and brew La Colombe coffee.
In addition, they offer free wifi for guests.

Product Reviews

It's been too long, I know I know. I have been busier than you could ever imagine, but I (of course) have made time to try a couple new products to share with you!


(photo taken from here )


First off, dessert. I first tried Trader Joe's Soy Creamy ice cream in vanilla for making fruit smoothies. However, I went to TJ's the other day and decided to take home the Cherry Chocolate Chip flavor. I'm not a huge cherry fan, but I loved the vanilla flavor and wanted to try something different. Basically, it's cherry flavored soy ice cream with cherry and chocolate chunks in it. And, it is TO DIE FOR. oh my god. I could eat this all day long!! First off, it's super super creamy and is perfectly sweet. It doesn't have any weird after taste like (in my opinion) So Delicious soy ice cream does. And, it's chock full of chocolate chunks so you get some in every bite. You must try this!!


Origins A Perfect World Moisturizer


For months I had been using a moisturizer from Lush with so-so results. My skin is pretty normal but errs on the dry side, and when I don't moisturize my skin tends to break out. The product I was using from Lush didn't seem to absorb well, and left my skin a little greasy. So, I decided to take a gander at Origins. The associate pointed me to this moisturizer, and it was a little more expensive than the one I was using but I gave it a try anyway. The very first night I used it I was blown away. It smells great and has a totally different texture than the moisturizer from Lush. It was much thicker, and didn't leave my skin feeling greasy at all. I use it at night after washing my face, and in the morning before applying my makeup and it's absolutely fantastic.
I would also recommend the Modern Friction scrub which I have found is rated one of Origins' best products for a reason... after one use your skin will look much, much healthier.

Thursday, January 8, 2009

Potato Pancakes

Potato Pancakes


I looove potatoes, as you've probably noticed. after making my pierogies I had a decent amount of left over potatoes (I used 3 large instead of 3 medium; in my recipe I posted I recommended using 3 medium!) and decided to whip up some potato pancakes for dinner.
tips:
- what you need for potato pancakes is mashed potatoes, a little flour, a frying pan, and a little oil or margarine.
- you can make fresh mashed potatoes, but I've always found that leftover, refrigerated mashed potatoes work best.
- you want the potatoes to be on the dry side, or else they won't fry up properly which is where the flour comes in. depending on how moist your potatoes are, I'd start with a tsp of flour and add on from there. thoroughly mix the flour into the potatoes, and if you're able to form a slightly doughy pancake in the palm of your hand that doesn't fall apart too easily, you're set.
- you need to have your frying pan or skillet on medium to high heat before you put the pancakes into the pan. this ensures that they fry quickly and evenly, and don't fall apart.

- fry the pancakes for about a minute on each side, or until they are as brown as you'd like. when they're piping hot they're still a little fragile, so be careful when removing them from the pan. once they cool off they'll be stiffer and a lot easier to handle.

I ate a few of the pancakes with a salad of baby spinach and romaine tossed with a balsamic vinaigrette and some steamed veggies.

Pierogies

last night I took my first stab at making homemade pierogies! and, amazingly enough, they came out much, much better than expected.
basically, to make pierogies you need to make mashed potatoes and dough. you will also need a pot to boil the pierogies, as well as a skillet to sautee the pierogies after they've been boiled.

    filling:
  • 3 medium potatoes, washed and cut into chunks (I used red potatoes with the skin on)

  • 3-4 garlic cloves (I like a lot of garlic, so you can definitely add less)

  • 1/4-1/2 cup soy milk (I found that leaving the potatoes a little on the dry side worked best)

  • 1 medium onion, minced

  • 1-2 tsp margarine

  • salt and pepper to taste (I started with 1/2 tsp each)


    dough:
  • 1 cup flour

  • 1/4 cup water

  • 1 tsp olive oil


1. fill a large pot with water and turn to high heat
2. wash and cut the potatoes, and dice and mince the onion and garlic
3. boil the potatoes until they are tender, and at the same time sautee the onion and garlic in a skillet
4. once the onion and garlic are done, pour them into a bowl along with the drained potatoes, milk, and margarine. I used a potato masher to combine all the ingredients, but you could also use a hand mixer.

dough:
combine all dough ingredients in a bowl. once fully combined, knead the dough on a cutting board lightly dusted with flour. roll the dough out thin, but not TOO thin. you want it about 1/8-1/4 inch (you want it thin enough that it cooks well and isn't too doughy, but not so thin that it tears when you fill it with potato mixture. using a cookie cutter or the top of a glass, cut out circles. I made mine about 3 inches across, but you can make them whatever size you want. once you have all of your circles cut out, scoop a small amount (depending on the size of your circle, 2 tsp-1tbsp) of the potato mixture onto the center of the circle. fold over, pinch the edges lightly with your fingers, then press down with the tines of a fork for a nice detail.

once all of the pierogies are assembled, the cooking process is SO EASY. add the finished pierogies to the boiling water. they cook very quickly; the rule of thumb is that when they begin to float, they're done. you'll notice that they are now shiny.
remove pierogies from the boiling water and place in a skillet on medium heat with 1 tbsp of margarine. sautee until the pierogies turn golden brown, and serve!


the finished product:

Tuesday, January 6, 2009

Potato Lentil Soup


Potato Lentil Soup


when you have a craving for something ridiculously easy, surprisingly hearty and full of carbs, this is the soup for you!
while shopping at Trader Joe's one day I saw that they sold pre-cooked vacuum sealed brown lentils in the refrigerated section. I was intrigued by these, and bought a pack. seeing as how they're pre-cooked, they only need to be heated up. I felt that lentil soup (beans alone) souned a little boring, and needing to use up some potatoes, this recipe was born.

    what you need:
  • 1 package (or can) pre-cooked brown lentils

  • 1 container vegetable broth

  • 4-5 medium red potatoes; washed and peeled

  • 1/2 of a medium white onion, diced

  • olive oil

  • salt, pepper, cumin, and garlic pepper to taste


1. heat a soup pot. add a small amount of olive oil, and on low heat sautee the onion until transluscent.
2. once the onion is cooked, add the vegetable broth and potatoes (peeled and cut into 1-inch chunks). add seasonings and bring to a boil.
3. once potatoes are almost done (prick with a fork), add the lentils and cook 5 more minutes until lentils are warm.